Attention-Grabbing Designs
Capture visitors’ attention with eye-catching gradient colors and mesmerizing animation effects that boost interactions.
Increase Sales and Generate Leads
Create Countdowns, Sign-Ups and Free Shipping Bars to improve on sales and capture valuable leads.
Build Trust with Effective Communication
FooBar simplifies customer communication, keeping them well-informed and fostering trust in your brand.
Easy Setup with Customizable Templates
Set up FooBar quickly and customize it effortlessly with real-time previews and intuitive settings.
FooBar Demos
Click on a button below to see a demo of the notification bars!
Unlock the Power of FooBar’s Free Features
The FooBar plugin includes awesome features to enhance your customer communication!
Discover FooBar PRO Features
Advanced Layouts
Unlock advanced bar types and elements with FooBar PRO!
The Sign Up Bar: integrate with Mailchimp to capture leads directly from your notification bar.
The Countdown Bar: Create urgency, excitement, and FOMO to encourage customers to “Buy Now!”
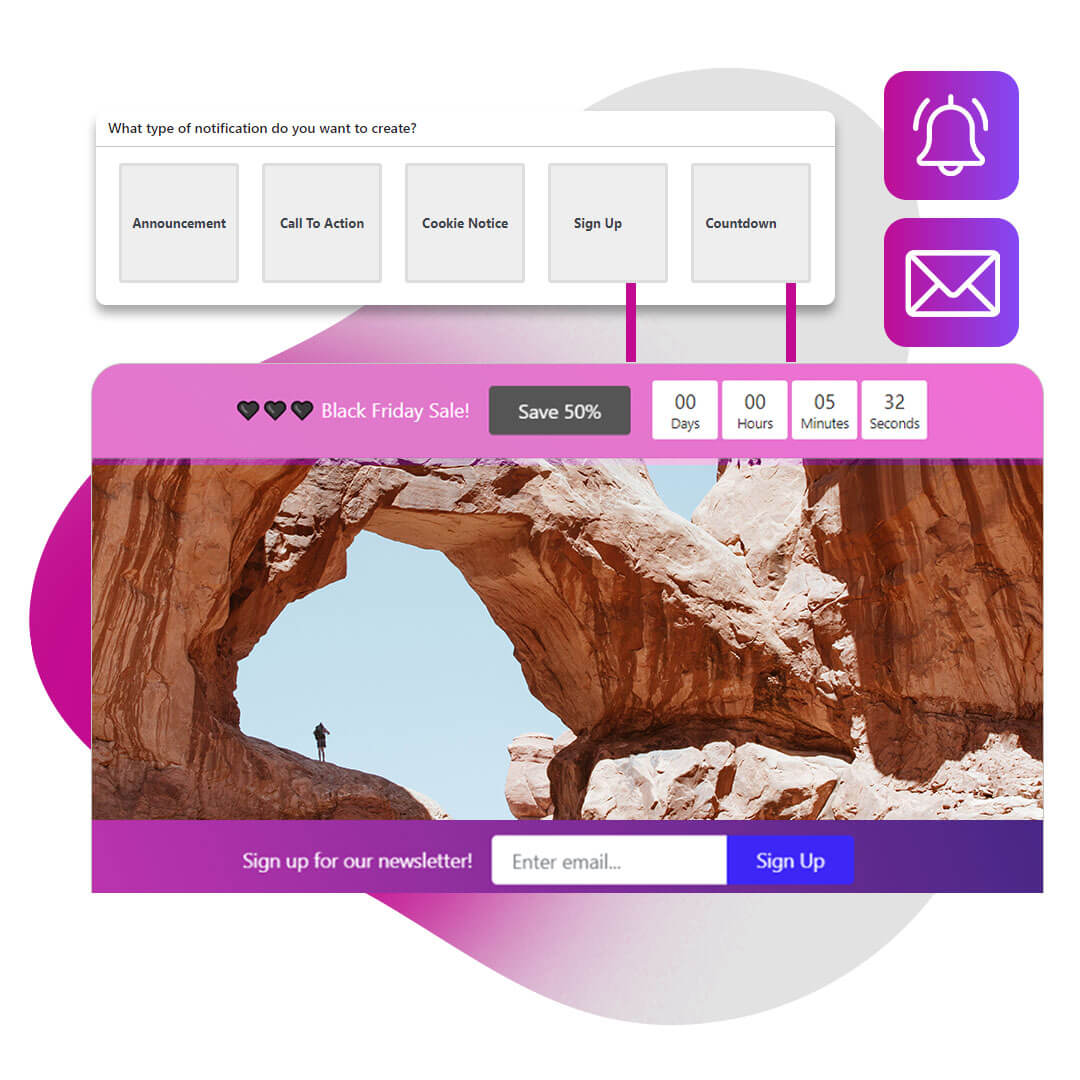
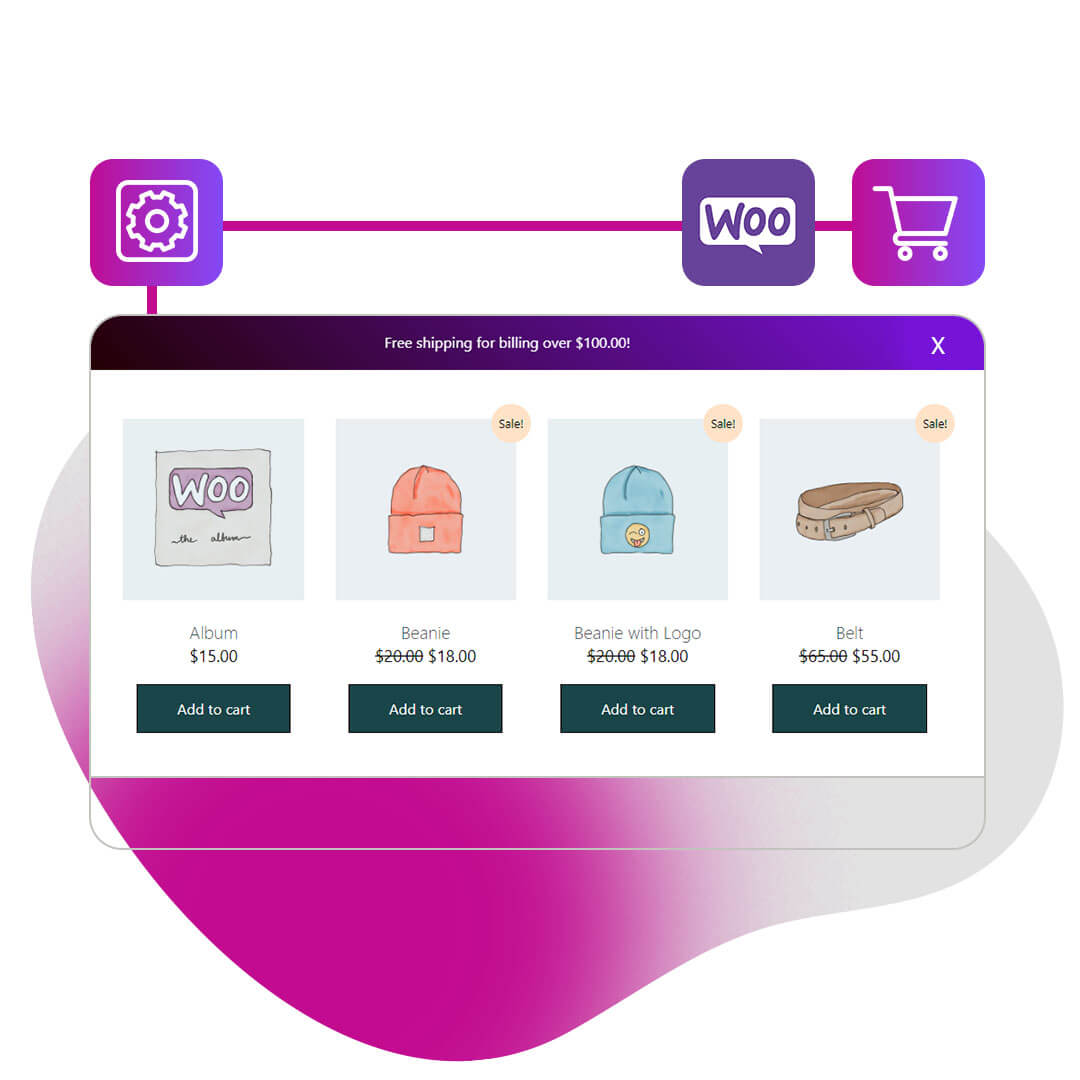
WooCommerce Free Shipping Bar
The free shipping bar is a great addition for any online store using WooCommerce. The bar integrates with the shopping cart, allowing you to offer free shipping for orders over a set amount.
The bar includes:
- An initial Free Shipping offer.
- A Progress slide, appearing once a customer adds something to the cart.
- A Success message for when a customer meets the required target; this includes a button taking customers directly to their cart or checkout.
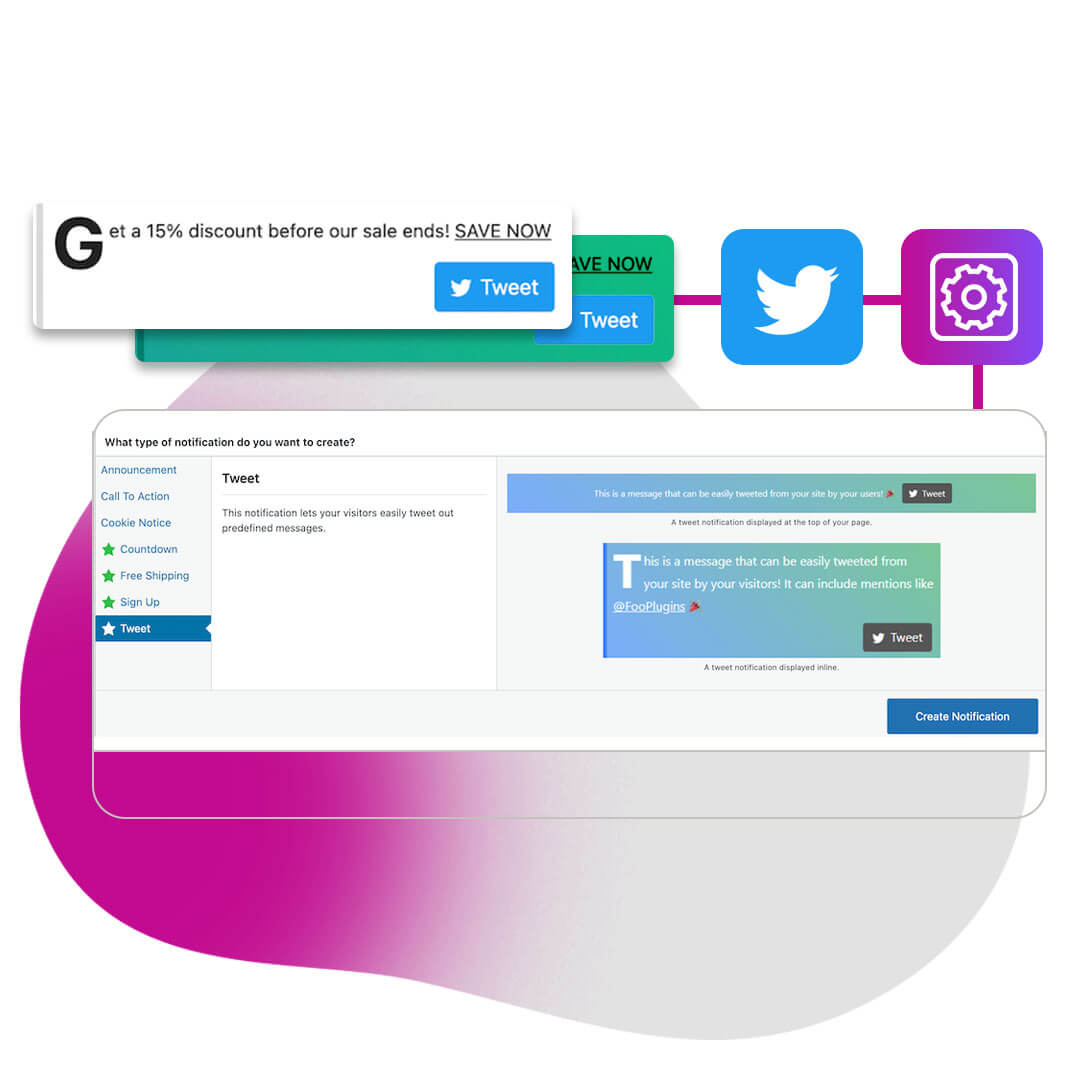
Click To Tweet Bar
Boost your social media engagement by adding Tweet bars to your content. This bar-type lets you compose Tweets within the bar, which visitors can then easily click.
You can add links to your Tweet as well. Plus you can add @mentions which will link back to that Twitter profile from the bar itself.
Find out more about the Click To Tweet Bar.
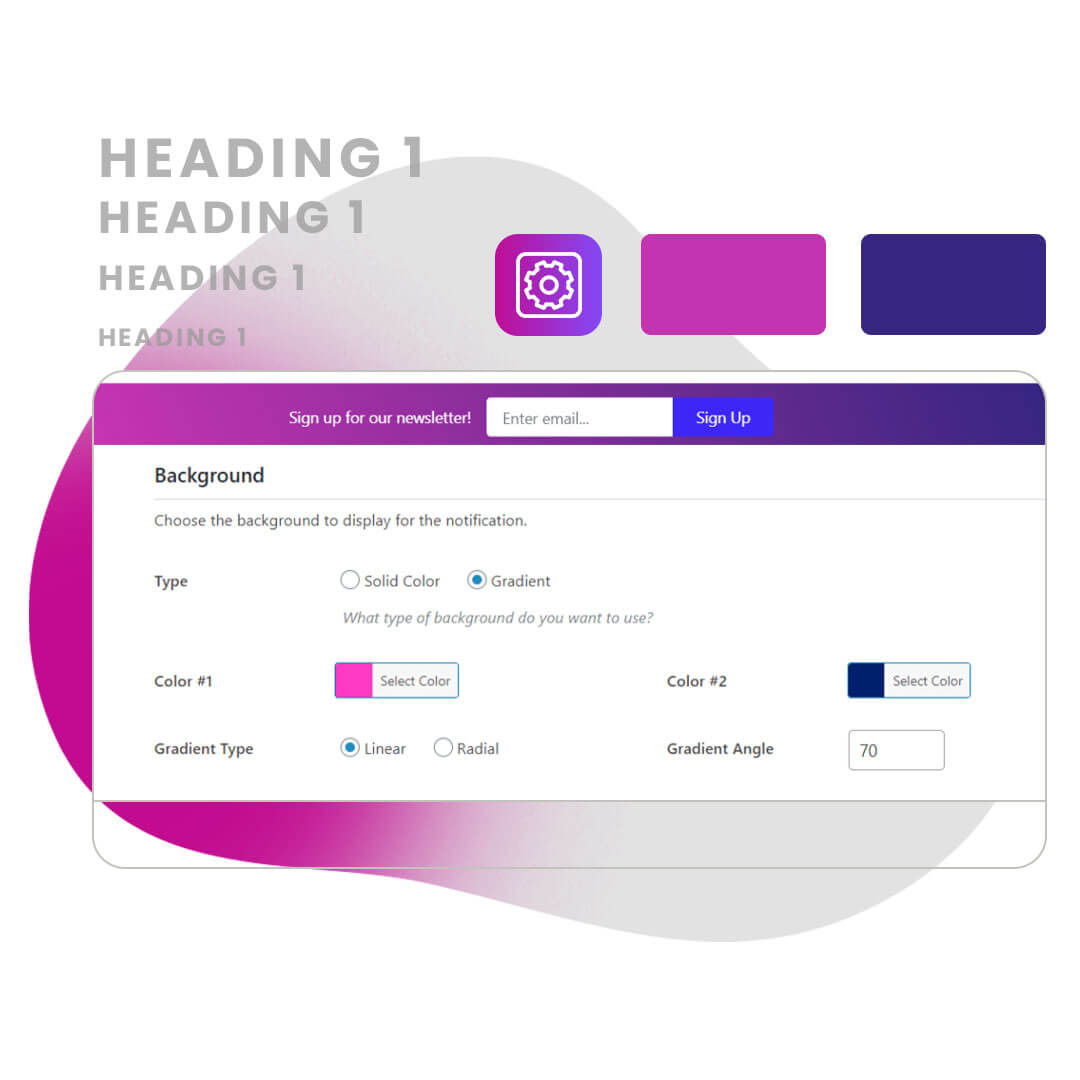
Advanced Customization
Tailor your notification bars to match your theme, stand out, and draw attention.
- Custom Color Schemes
- Gradient Colors for a Pop Effect
- Toggle Icons for Eye-Catching Appeal
- Choose the Best Font Size for Your Bar
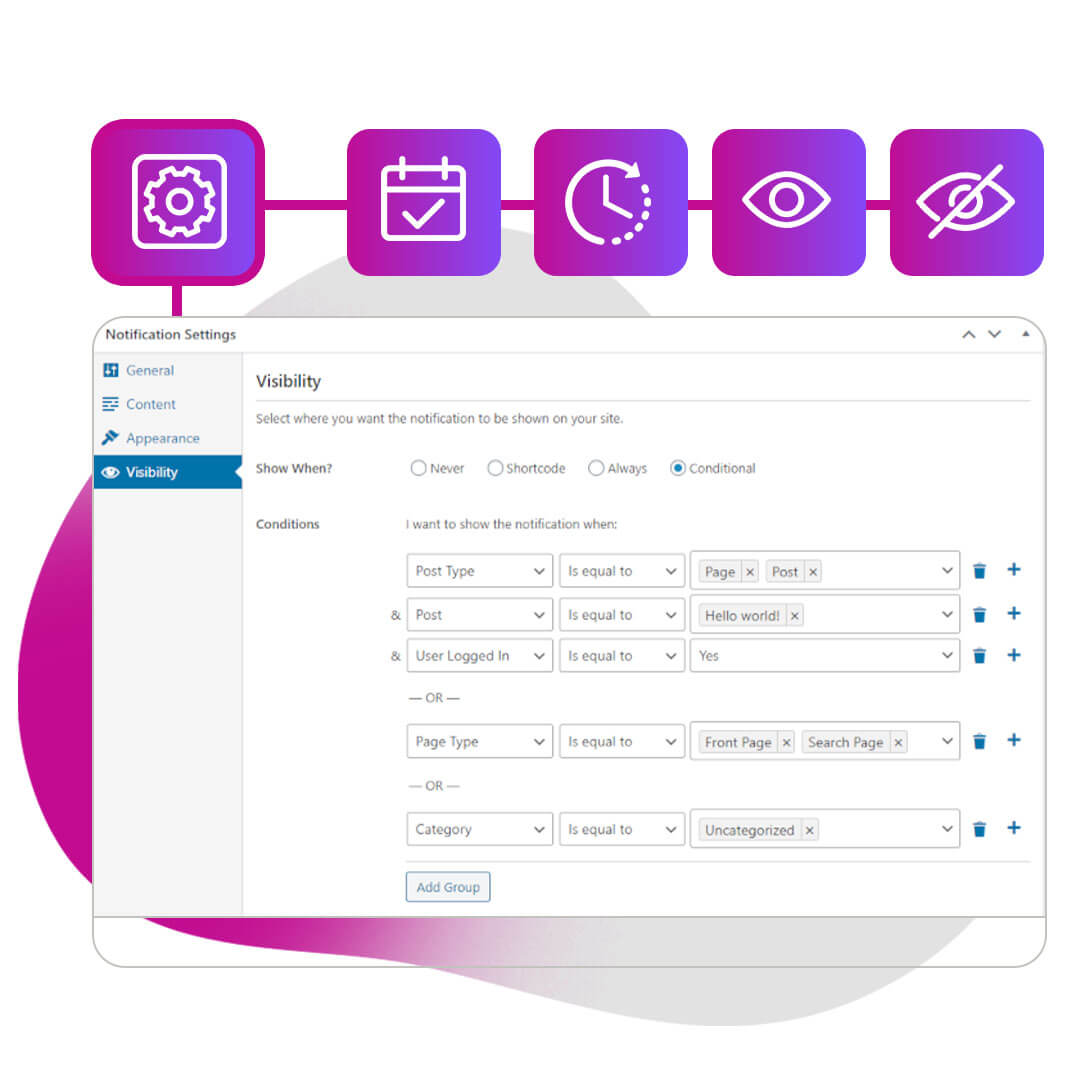
Versatile Visibility Settings
Decide where and when your notification bars are visible.
- Conditional Visibility Settings for Specific Pages or Post Types
- Schedule Start and End Times to Never Miss an Opportunity
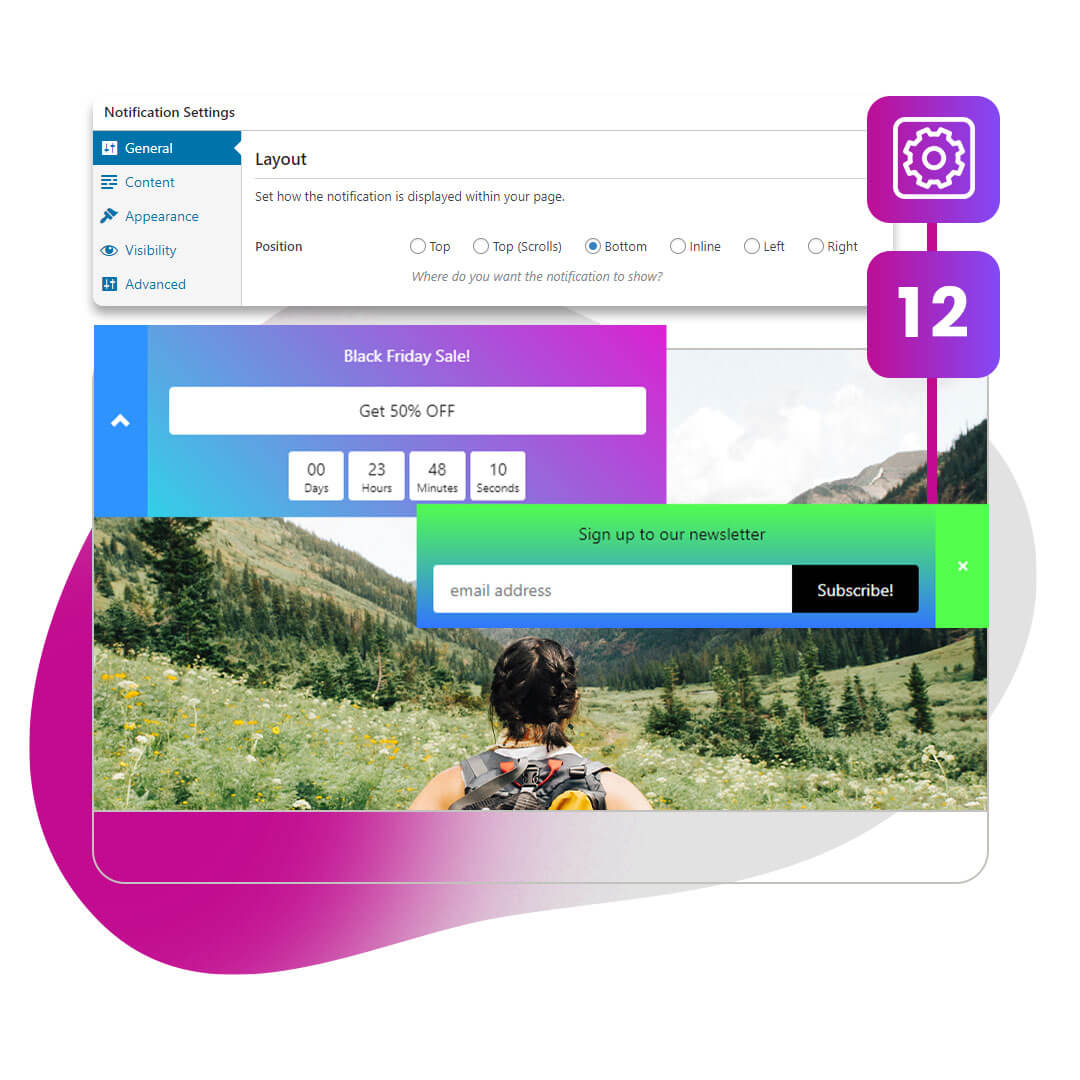
Effective Placements
Choose from 12 positions to make the biggest impact with your notification bars.
- Top or Bottom of Your Page
- Inline Placement
- Left or Right Placement
- Fullscreen Sidebars for Extra Visibility
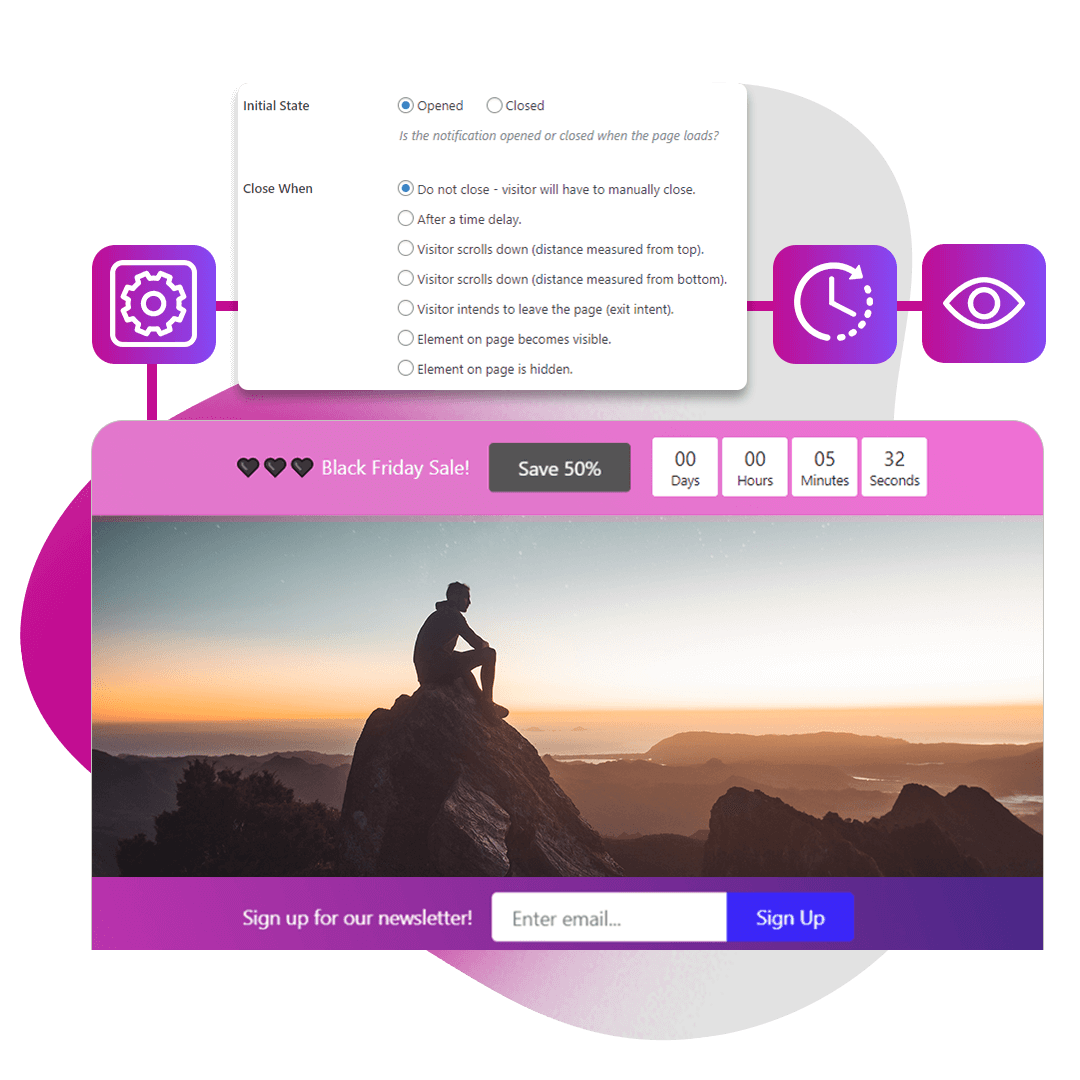
Open & Close Triggers
Trigger your bar to open and close! FooBar PRO Gives you various options for setting your notification bar to open or close. These triggers include:
- a Time Delay
- Exit Intent
- When a visitor scrolls down
- When a specific element becomes visible
- Or when a specific element is hidden
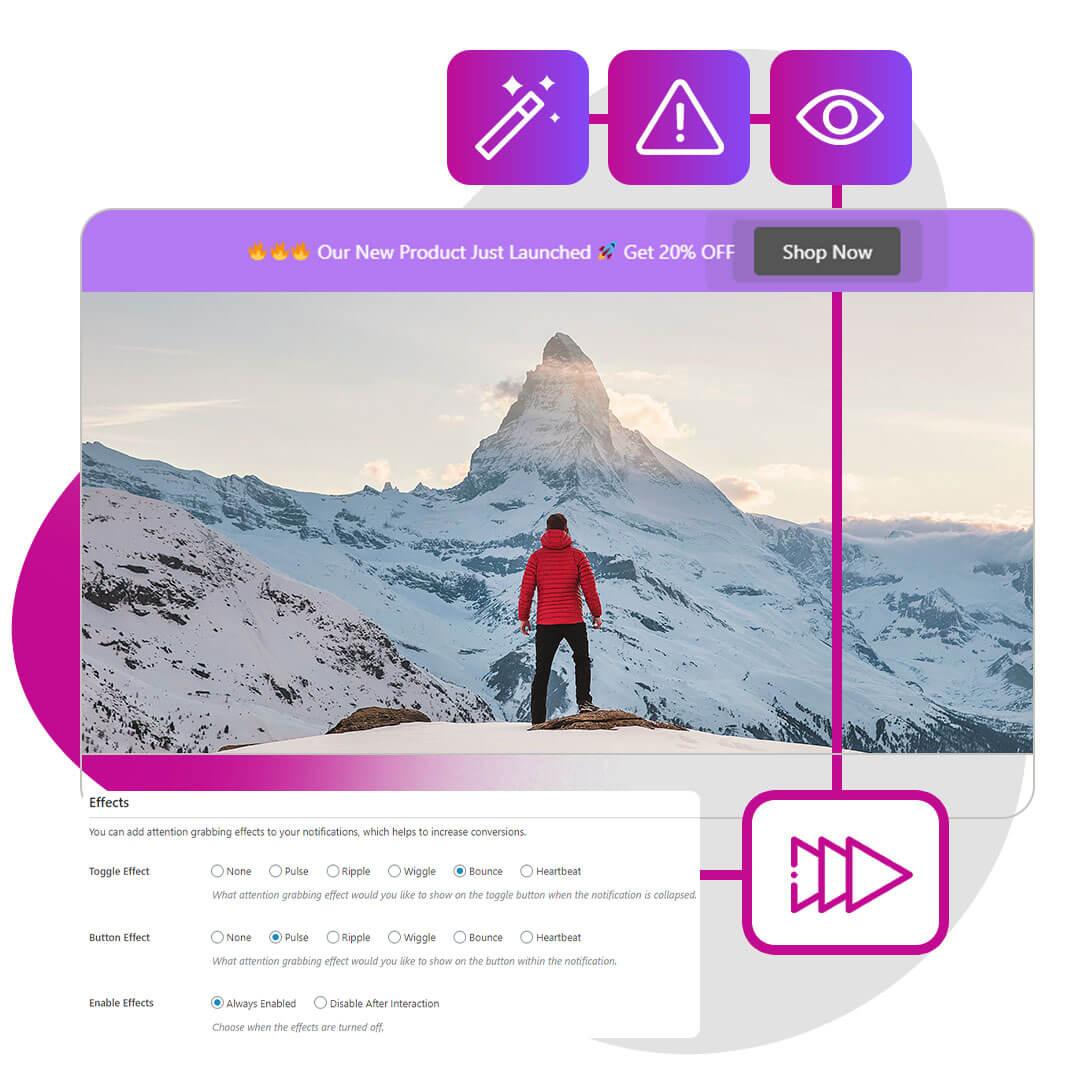
Attention-Grabbing Effects
Utilize animated effects for buttons and toggles to draw attention and increase interactions. Our premium notification bars are designed to grab your visitor’s attention with special animated effects for buttons and toggle elements. Make your buttons pulse or set your toggle to wiggle or bounce! These animations are designed to draw attention and help you convert.
FooBar FAQ
What is FooBar?
FooBar is a powerful WordPress notification bars plugin that helps you create announcements, general messages, and effective CTA’s. It’s designed to improve communication with your customers and drive your business forward.
Good communication can help build trust and establish a good relationship with your audience. Message and announcement bars can help you accomplish this. Effective CTA’s then direct your visitors to take action, increasing sales, building your audience and growing your business.
This makes FooBar an effective tool for any business website.
Is FooBar easy to use?
Absolutely! With just three simple steps, you can set up your notification bars. Choose your bar type, add content, and customize its appearance. FooBar PRO goes even further with scheduling features that automate the start and end times for your bars.
Of course, you can then add more customizations and tweak your bar to create the ideal notification. With FooBar, this is simple to do. The intuitive setup keeps it simple, so you can create your notification bar in just minutes.
FooBar PRO takes this ease-of-use a step further with scheduling! Here you can set you start and end dates and times, and leave FooBar to do the rest.
How can I use FooBar?
FooBar is a versatile WordPress plugin that allows you to build cookie notices, announcements, CTA bars, sign-up bars, and countdown bars. Use these notification types to inform your audience, generate sales, and grow your business.
With these notification types, you can do any number of things. This includes setting up general announcements, warnings or messages for your audience. The Cookie Notice bar can be used to inform people about cookies, as well as to draw attention to T&Cs or other policies. The countdown bar is a great way to generate sales, but can also be used for a launch or any event to which you are counting down.
With the versatile visibility settings, you can add these to specific pages or posts, or run them sitewide, to ensure that the right people see these messages. You can also place your bars where they’ll have the biggest impact.
Does FooBar include Bottom Bars?
Yes! FooBar Free and PRO both include bottom bars that you can add to your website for enhanced engagement and communication.
What’s the difference between free and PRO?
FooBar Free provides essential features, while FooBar PRO unlocks advanced bars, customization options, additional icons, and scheduling features.
FooBar Free provides you with the basics. With this, you can set up simple bars that still do the job you want them to do. The Cookie notice comes with premade content, which you can adjust to suit your needs. But the Announcement and CTA bars can be tailored to work for you.
You can include your message, emojis, links and so on, plus the CTA bar includes a button. There are 8 colors to choose from, including black and white, and a selection of basic icons.
You visibility settings include a shortcode option, so you can show your bar on select pages. You also have the option to set the bar on the top or bottom of the page.
FooBar PRO
The premium plugin brings you all of this and more! To start with, you get additional bars, including Countdown, Sign Up, and WooCommerce Free Shipping Bars. These give you more advanced, more business-driven features. You can integrate the Sign Up bar with Mailchimp and grow your newsletter base. Use the Countdown bar to drive sales or launch an event. Or entice customers to buy more with the Free Shipping bar.
Add attention-grabbing animation effects to your buttons and toggles to increase the bar’s rate of interaction. You can also do this by using the custom appearance settings. With this, you can use gradient colors to make a statement or choose any color for your bar and other elements. FooBar PRO also includes more icons to help you create unique notifications.
There are 12 bar positions to choose from with FooBar PRO. Apart from top and bottom, you can also create inline bars or place your bars on the left or right of the page. Coupled with the visibility settings, you have complete control over when and where the bar displays. The conditional visibility logic lets you select the exact page or post types on which you want the bar to show.
And to make your life even easier, we’ve included scheduling in FooBar PRO. With this, you can select the date and time on which you want your bar to start and end showing. So if you’re running a Christmas promotion (but you’re not planning on being in the office) you can set up your countdown bar, ticking down to the end of the promotion. Then select the start and end times and enjoy your holiday!
Plus, FooBar PRO includes bar triggers, meaning you can set your bar to open on Exit Intent, or after someone has reached a specific element on your page. You can also set it to close at a specific point or time.
How much does FooBar cost?
You can download FooBar Free on WordPress.org and get started today! IFor access to the PRO features, choose a payment and license plan that suits your needs. Options include 1, 5, and 25 site licenses, as well as a discounted lifetime license. You can also check out the FooPlugins Bundle, which includes FooBar, FooGallery, and FooBox at a reasonable price.
What if I buy Pro and I don’t like it?
As with all of our plugins, FooBar has a 30-day no-questions-asked refund policy. If you have purchased FooBar and discover (within 30 days) that it is not the right fit for you, we will refund your payment.
If you’re not sure whether FooBar is the right fit for you, then we would recommend that you make use of our Free Trial. The 7-day free trial lets you try out FooBar Pro for a week; this includes all of the premium features and gives you the chance to decide if FooBar is the right plugin for you.
Useful Links
Have questions or need more information? Check out our comprehensive documentation.
Supercharge Your Website with FooBar: Boost Conversions, Engage Visitors, and Drive Sales
Are you looking to take your website to the next level? Look no further than FooBar, the ultimate WordPress notification bar plugin! With FooBar, you can transform your website’s communication, engagement, and conversions effortlessly.
Skyrocket Conversions with Attention-Grabbing Bars
FooBar’s attention-grabbing designs with gradient colors and captivating animation effects will ensure your visitors can’t resist taking action. Whether it’s signing up for your newsletter, exploring limited-time offers, or making a purchase, FooBar will drive results like never before.
Engage Customers and Build Trust
Effective communication is the key to building trust with your audience. FooBar makes it simple to keep your customers well-informed, enhancing their overall experience and fostering trust in your brand. Show your visitors that you value their time and attention with eye-catching notification bars.
Complete Control and Versatile Visibility
FooBar puts you in the driver’s seat with advanced visibility settings. Choose where and when your notification bars appear using conditional visibility and scheduling options. Ensure the right message reaches the right audience at the perfect moment, maximizing the impact of your promotions and announcements.
Advanced Customization for Unique Branding
Your website deserves a unique touch, and FooBar PRO delivers just that. Stand out from the crowd with custom color schemes, gradient effects, toggle icons, and font size options. Tailor your notification bars to match your brand identity and make a lasting impression on your visitors.
Diverse Bar Types to Achieve Your Goals
Whether you want to grow your email list with the Sign Up Bar, create urgency with the Countdown Bar, or offer free shipping incentives with the WooCommerce Free Shipping Bar, FooBar has you covered. Unlock powerful bar types to align with your specific business objectives.
Easy Setup, Real-Time Previews, and Quick Customization
FooBar’s user-friendly interface makes setup a breeze. See your changes in real-time with frontend previews and customize your bars quickly and intuitively. Save time while creating high-impact notification bars that resonate with your audience.
Try FooBar Risk-Free
Still not sure if FooBar is the right fit for your website? No worries! Take advantage of our 7-day free trial to explore all the premium features and see the difference FooBar can make in boosting your website’s performance.
Unleash the Power of FooBar Today
Join thousands of satisfied users who have already transformed their websites with FooBar. Whether you’re an established business or just starting, FooBar will take your online presence to new heights, increasing conversions, engaging customers, and driving sales.
Don’t Miss Out on This Opportunity
Supercharge your website with FooBar and experience the benefits of higher conversions, happier customers, and a thriving online business. Get started now and discover why FooBar is the ultimate choice for WordPress notification bars.